
Way 1: Claude.ai, Claude Desktop and Claude Mobile (recommended)
These clients sign in via OAuth, you do not need an access key. The server URL is https://app.takodo.at/api/mcp. Open claude.ai and follow steps 1–10.
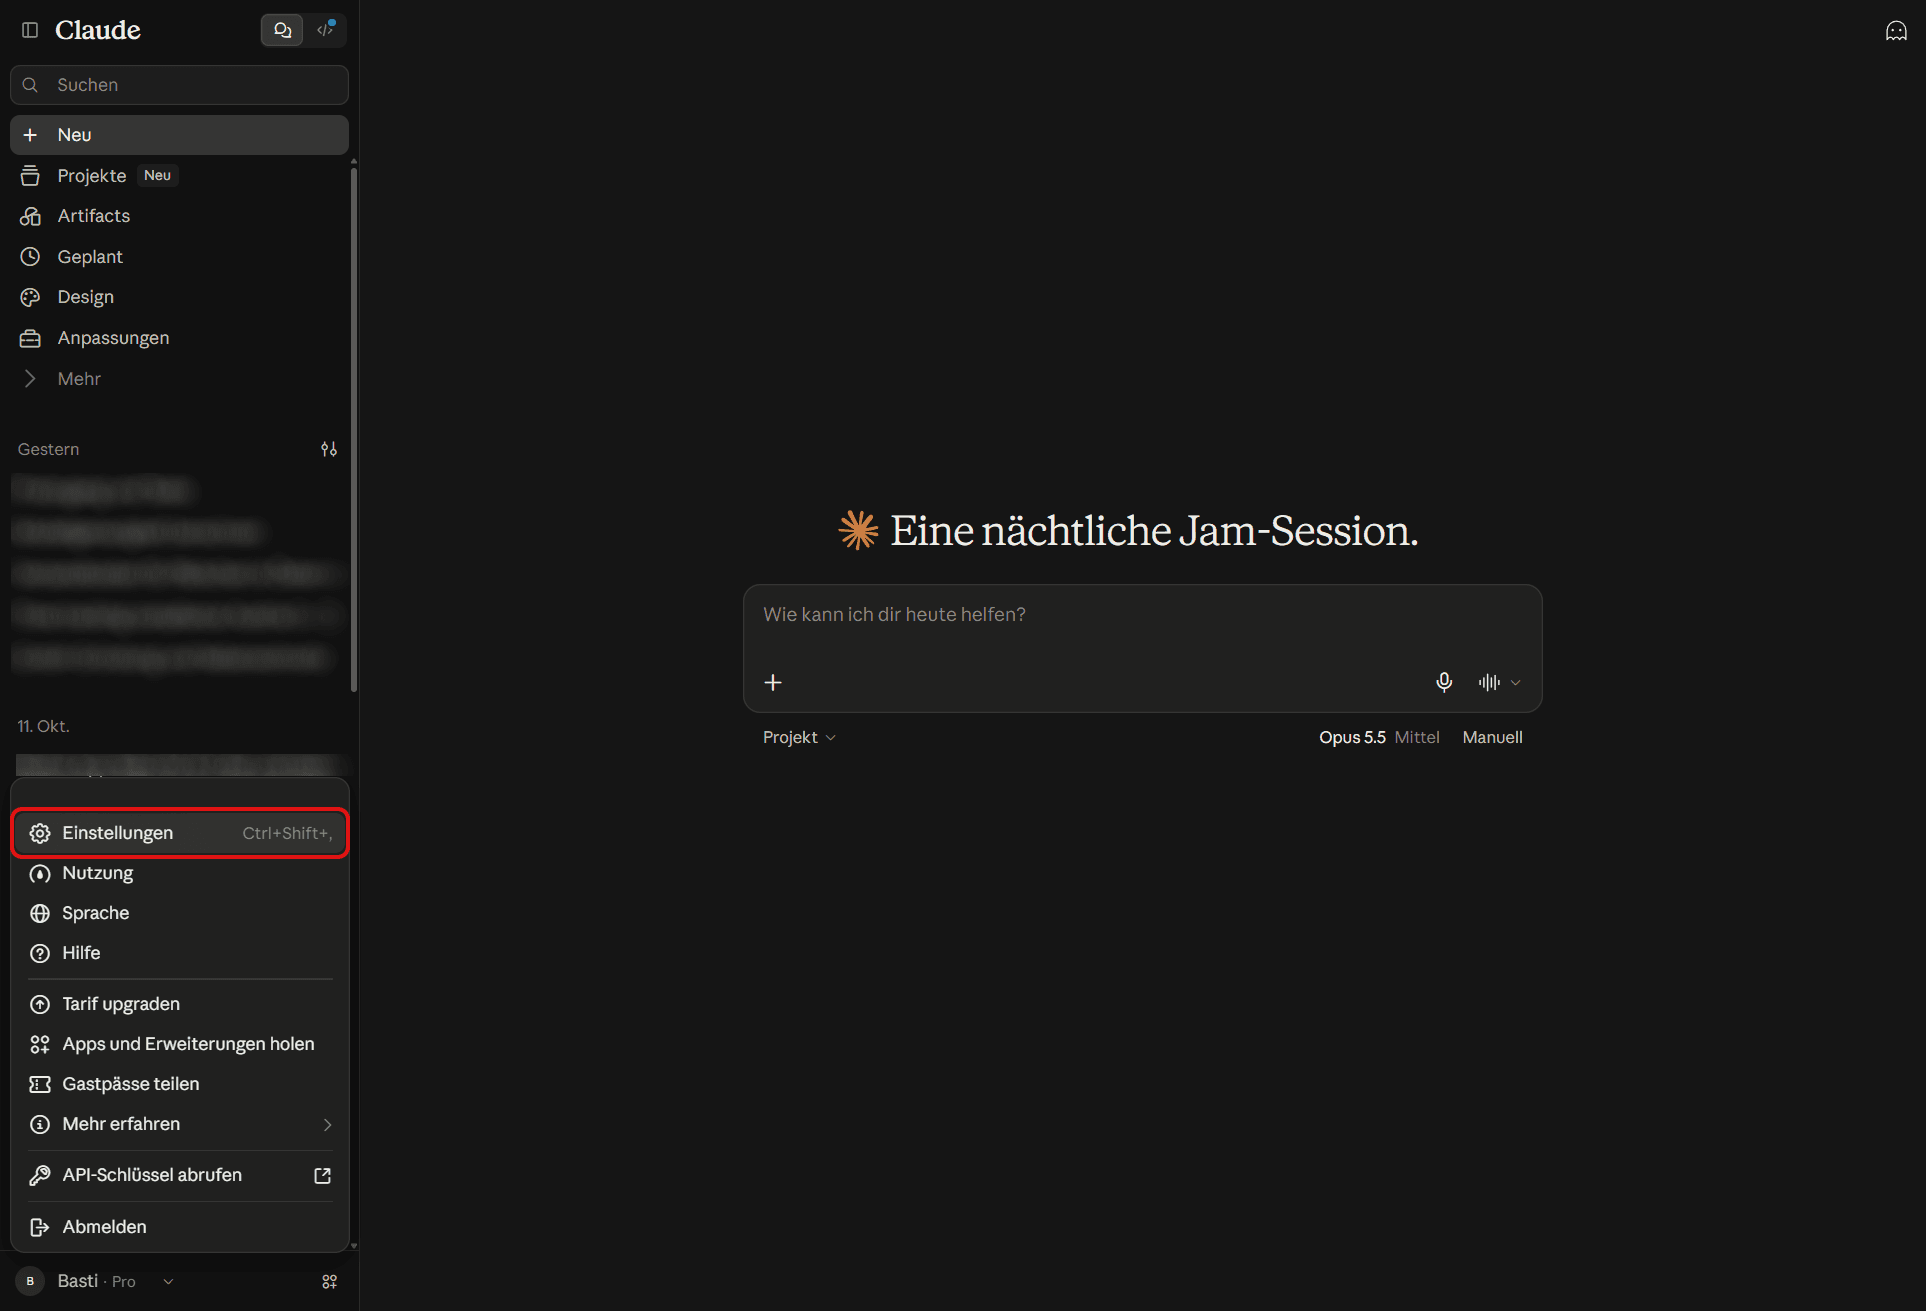
1. Open settings
Click your profile at the bottom left and choose Settings.
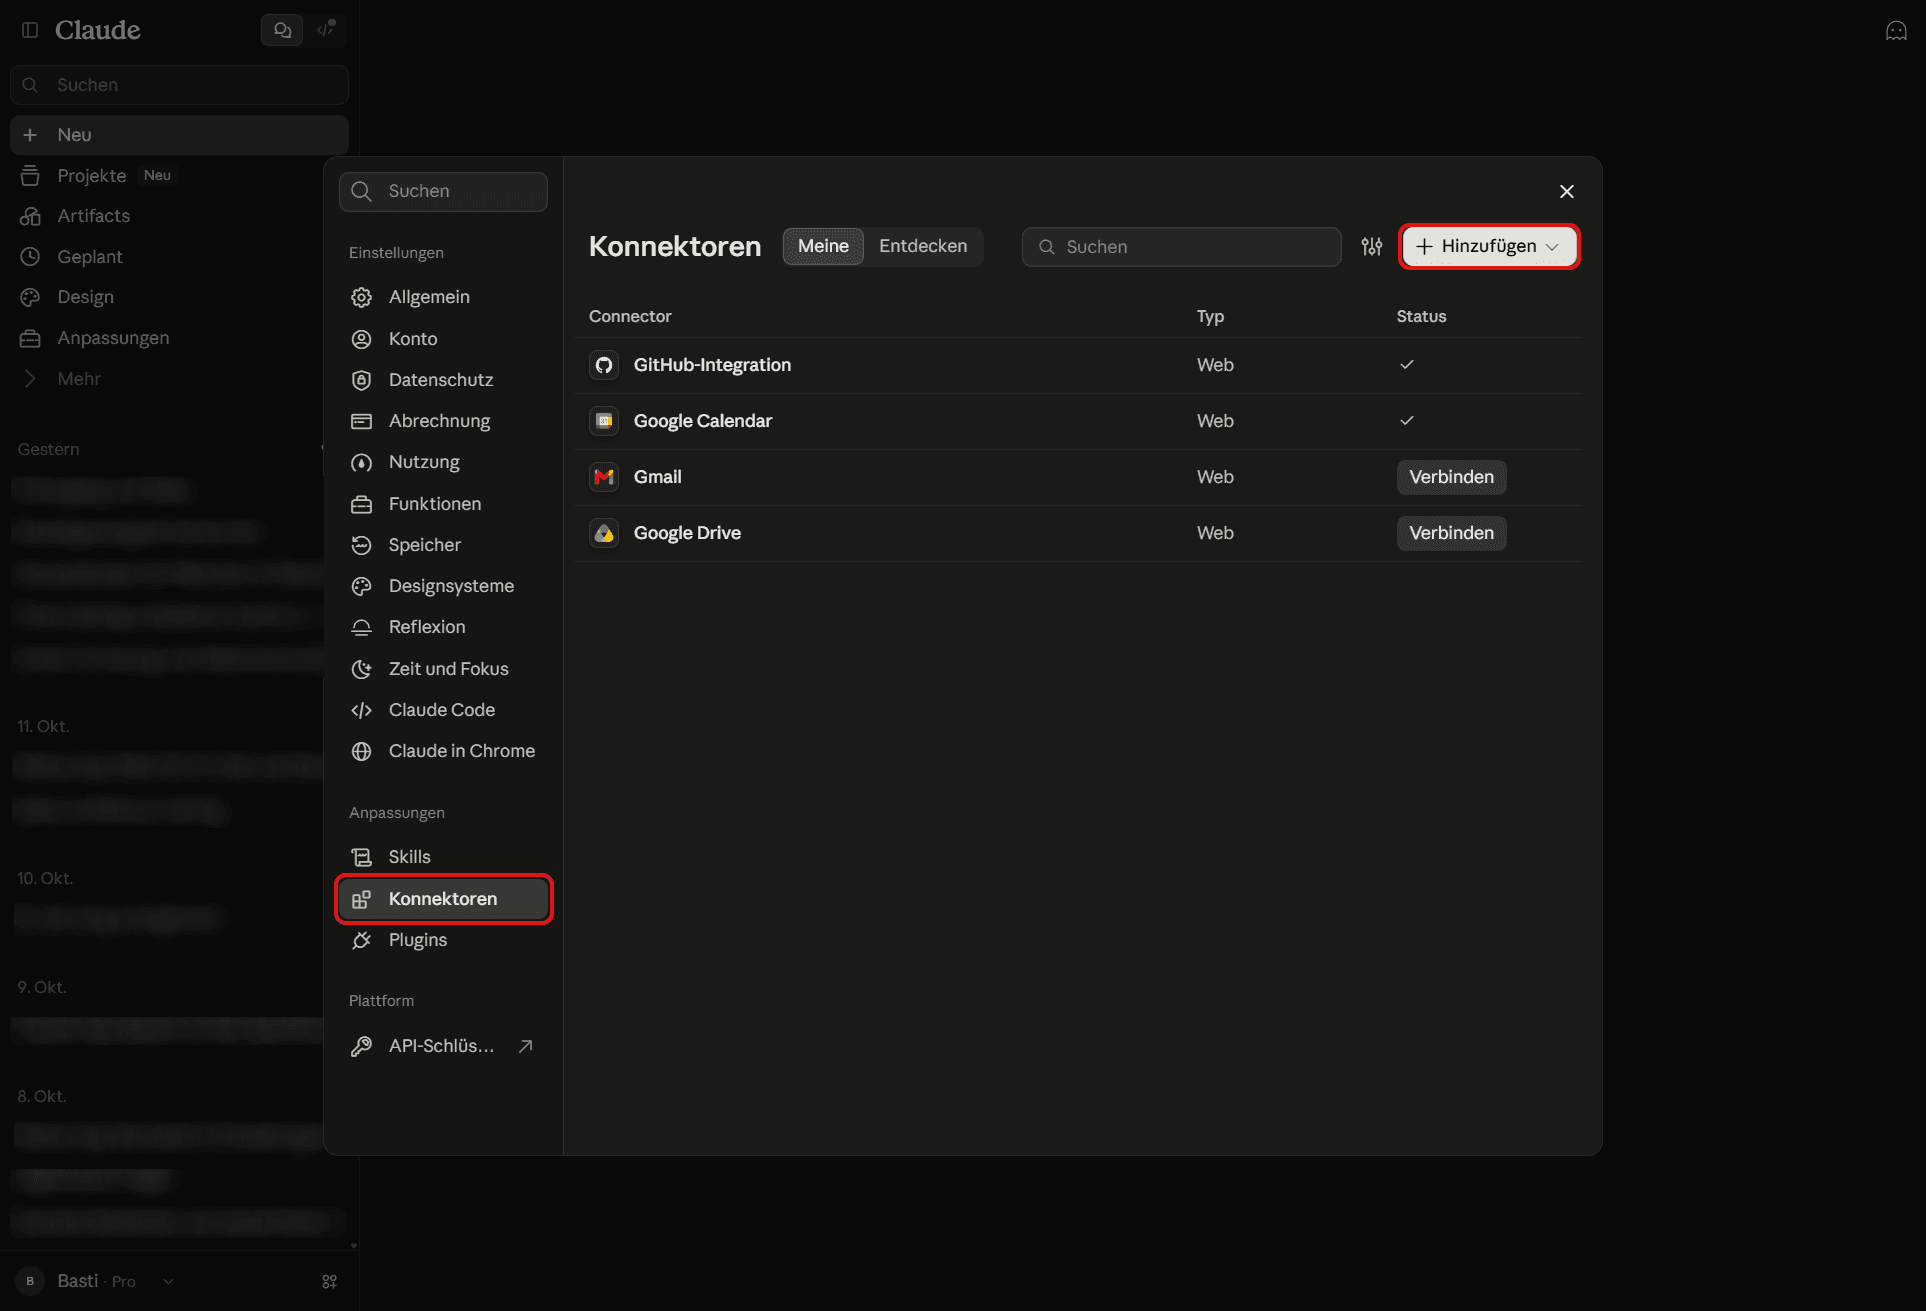
2. Open connectors
Open Connectors in the Customize section.
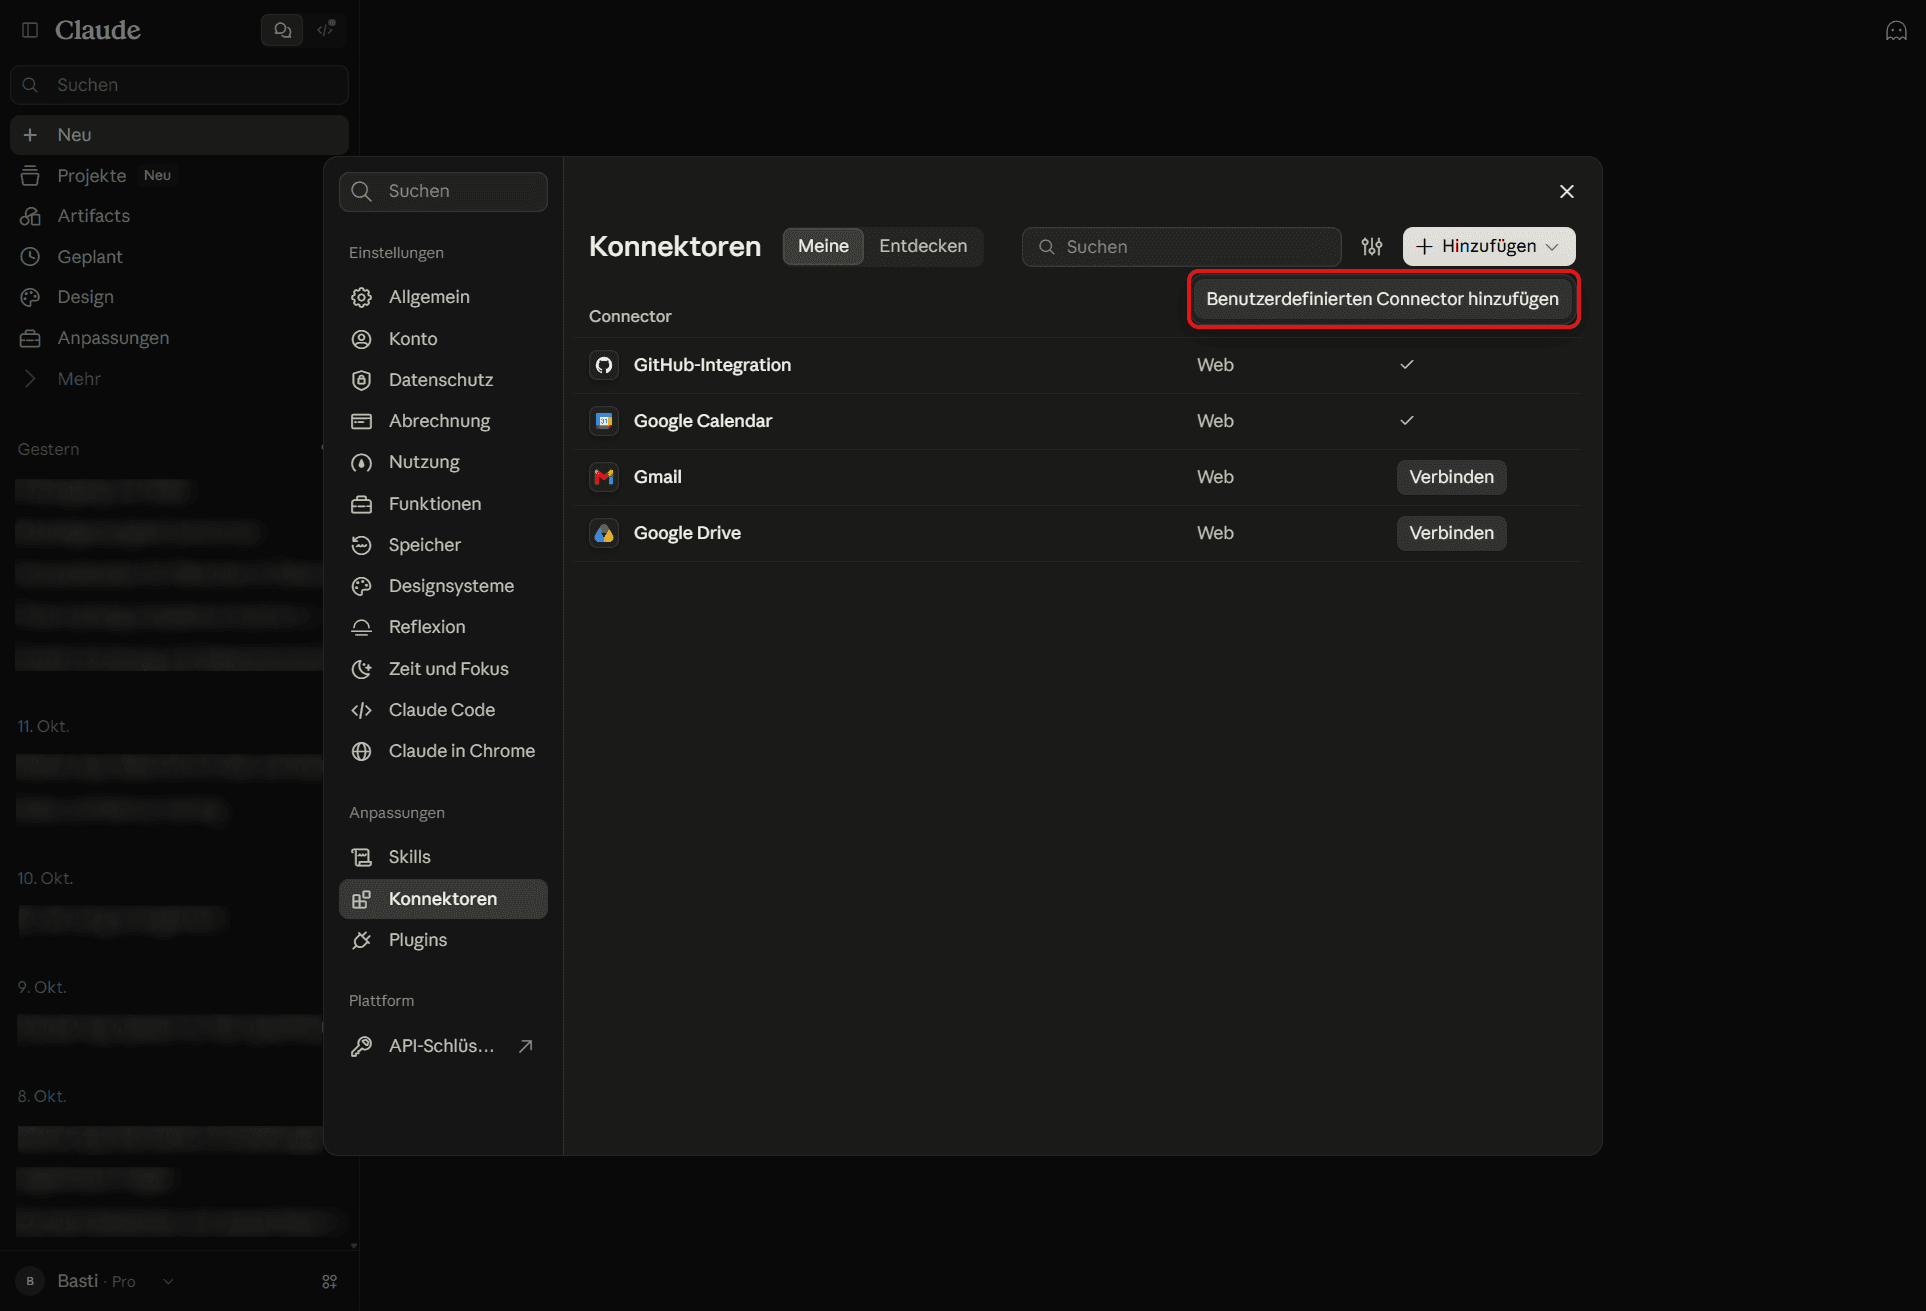
3. Add a custom connector
Click Add, then Add custom connector.
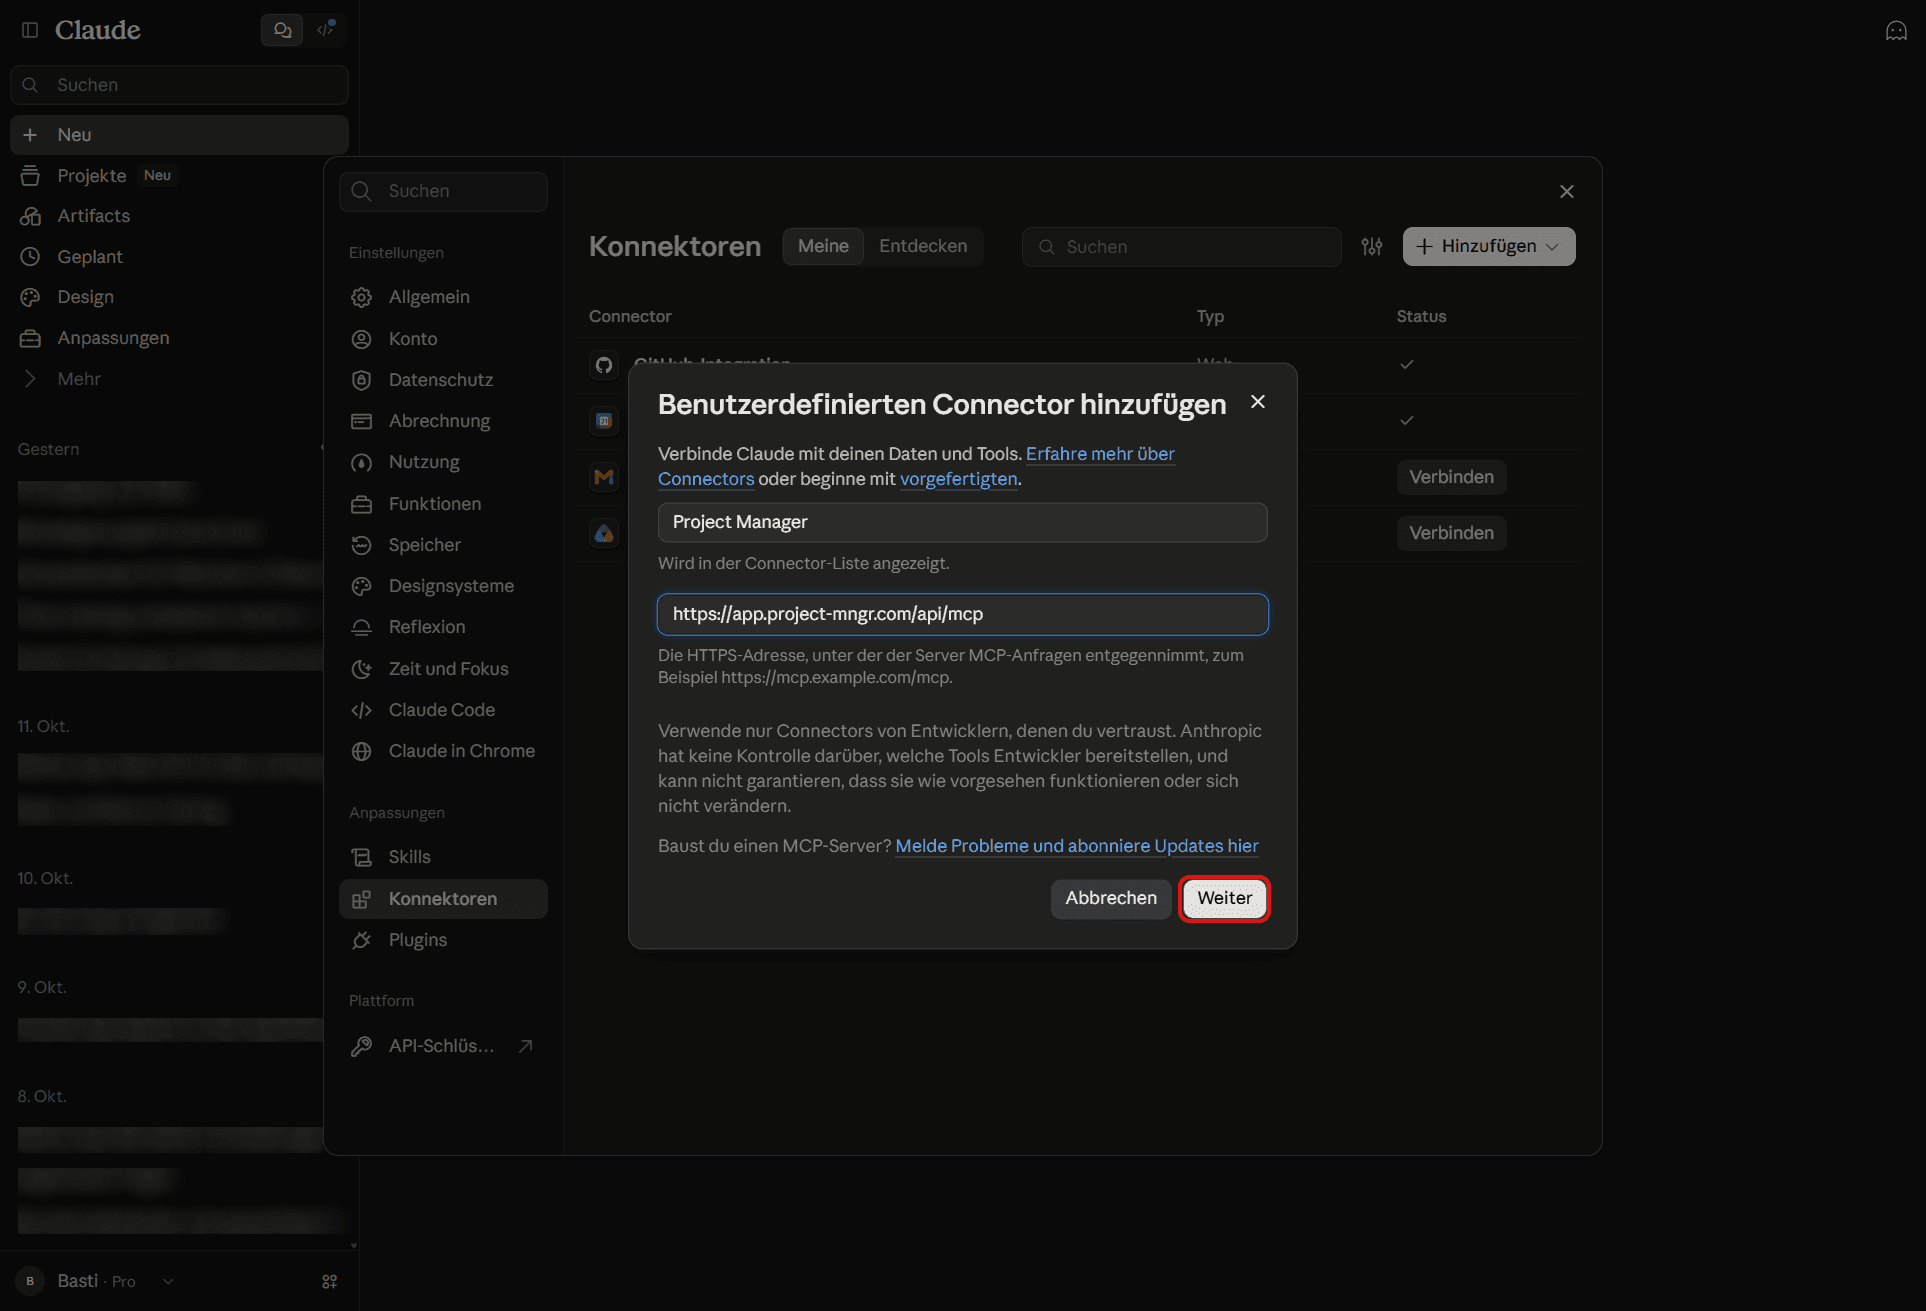
4. Enter name and server URL
Enter the name "Takodo" and paste the MCP server URL (https://app.takodo.at/api/mcp).
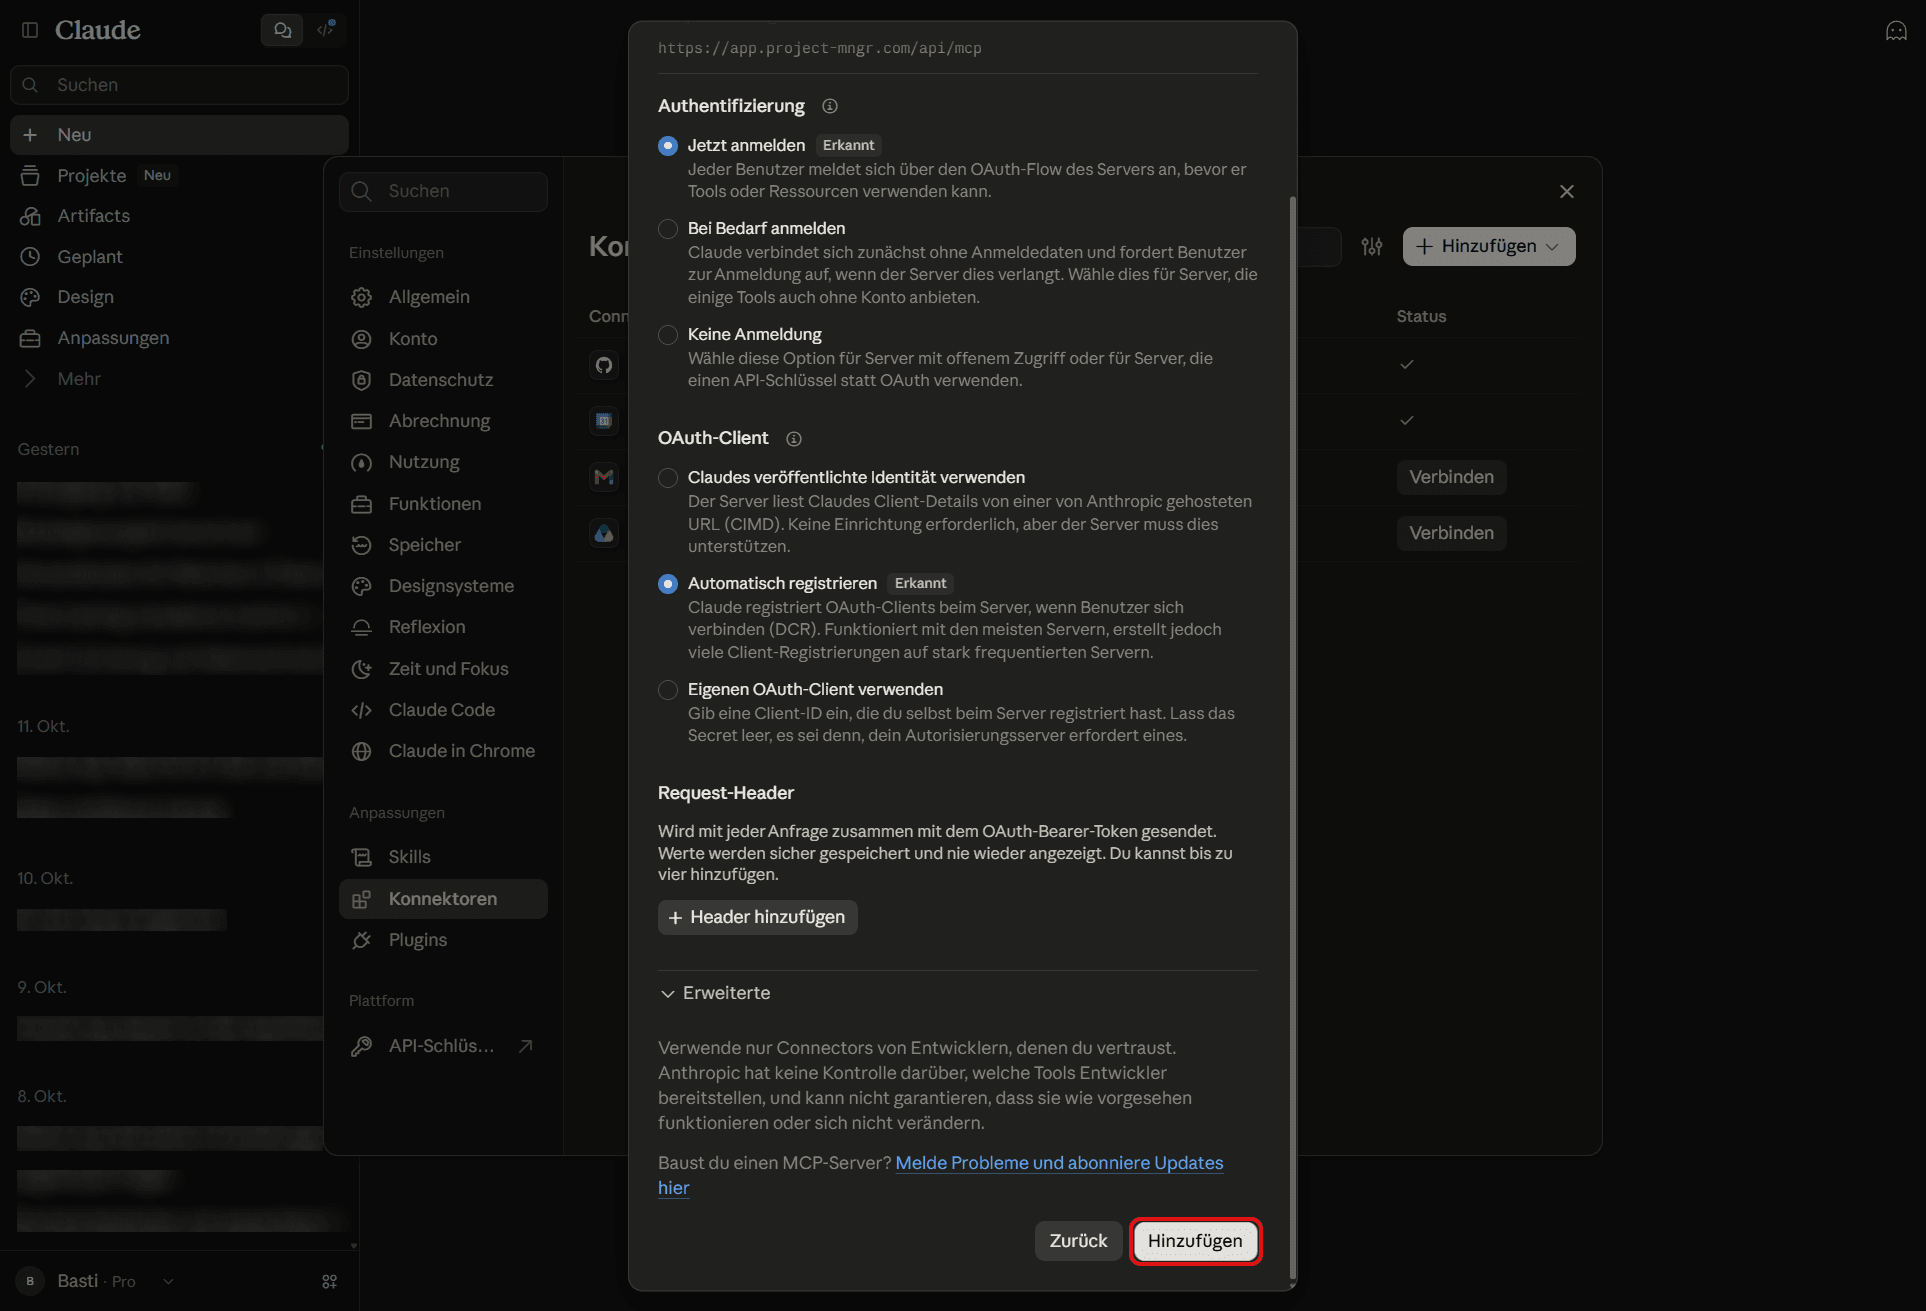
5. Confirm the defaults
Click Continue. Keep the defaults (sign in now, register automatically) and click Add.
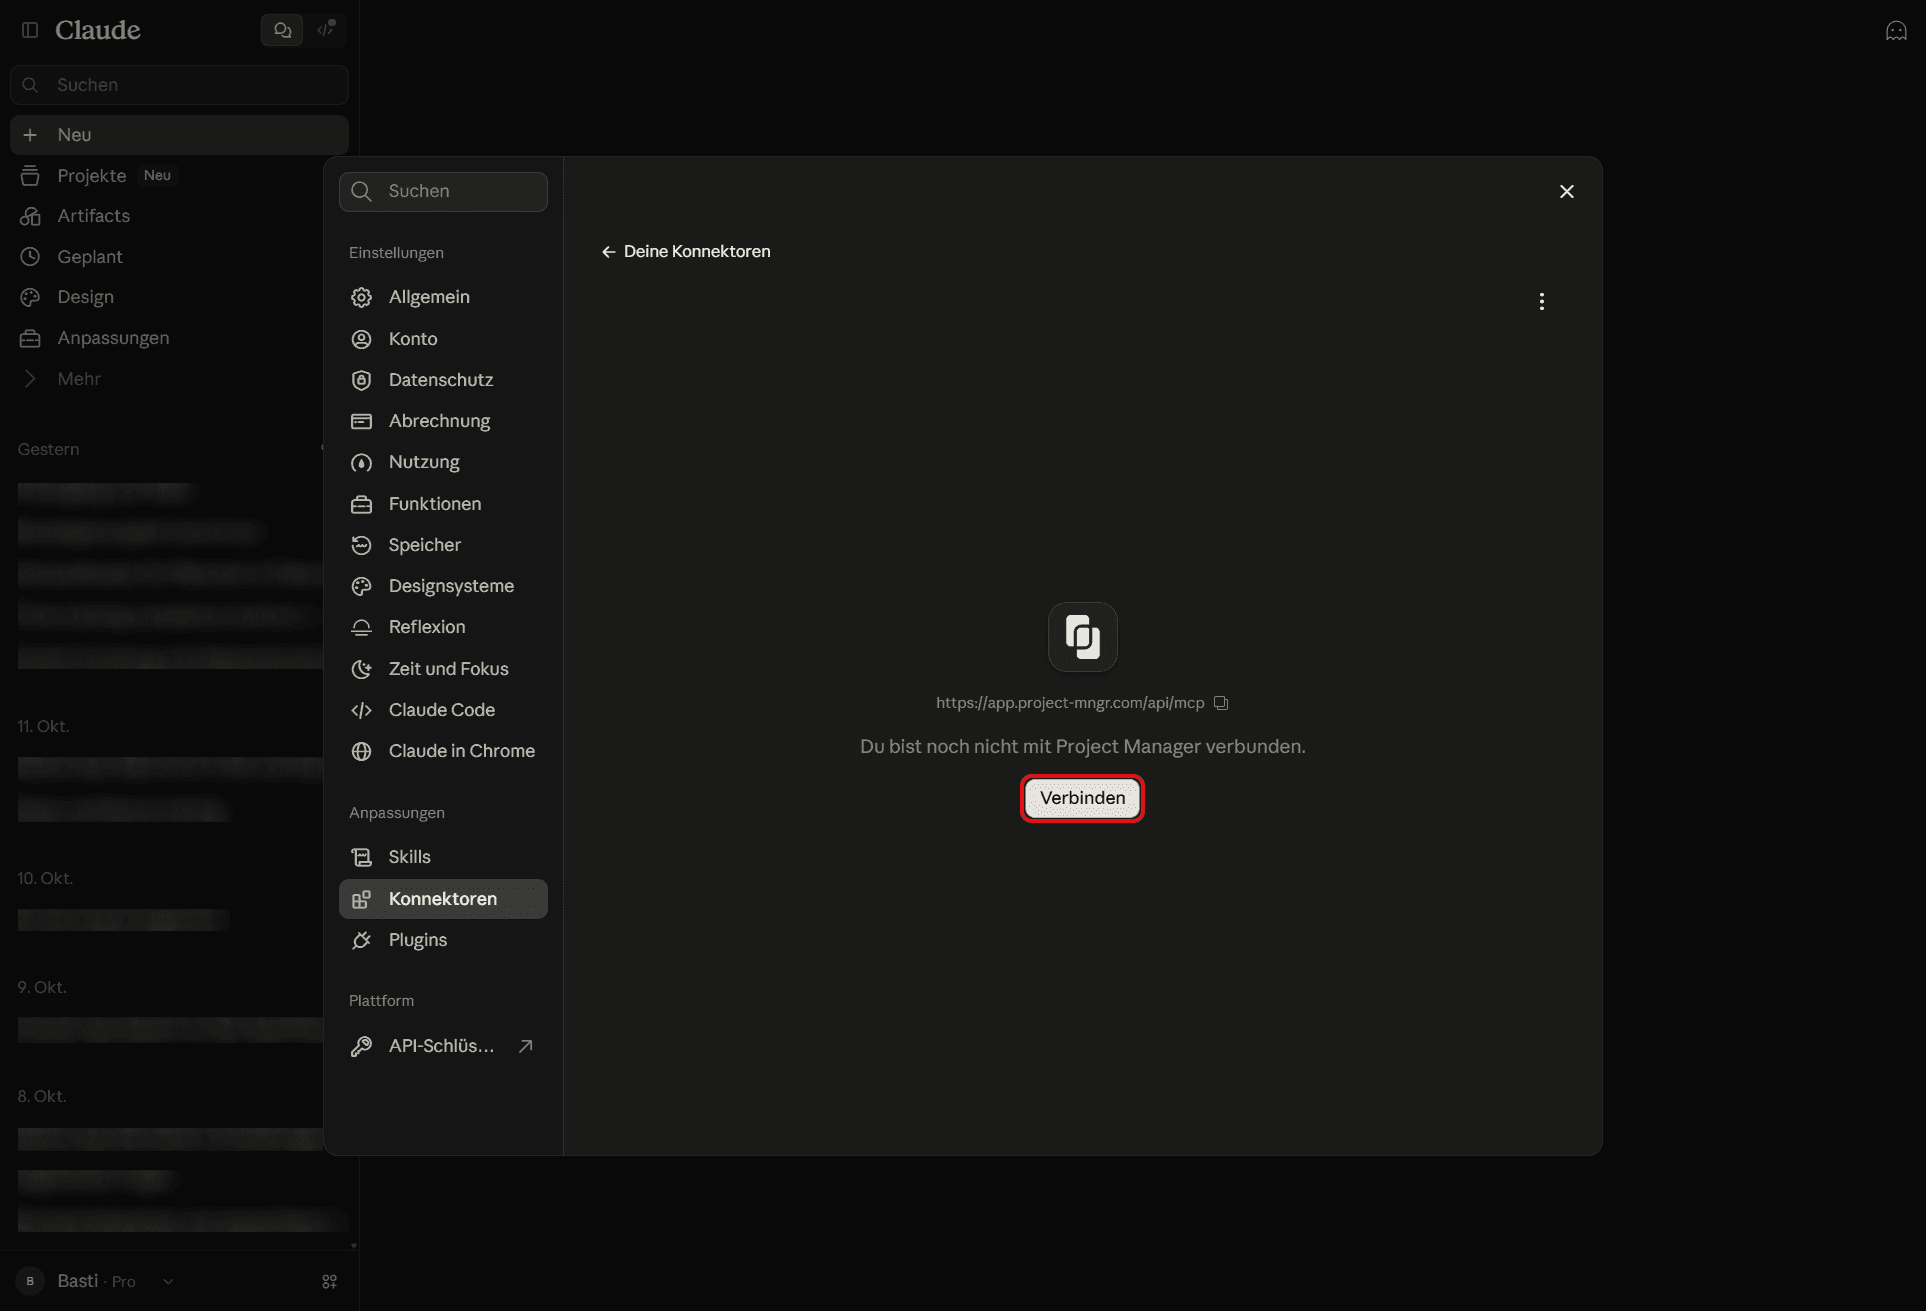
6. Connect
Click Connect on the new connector.
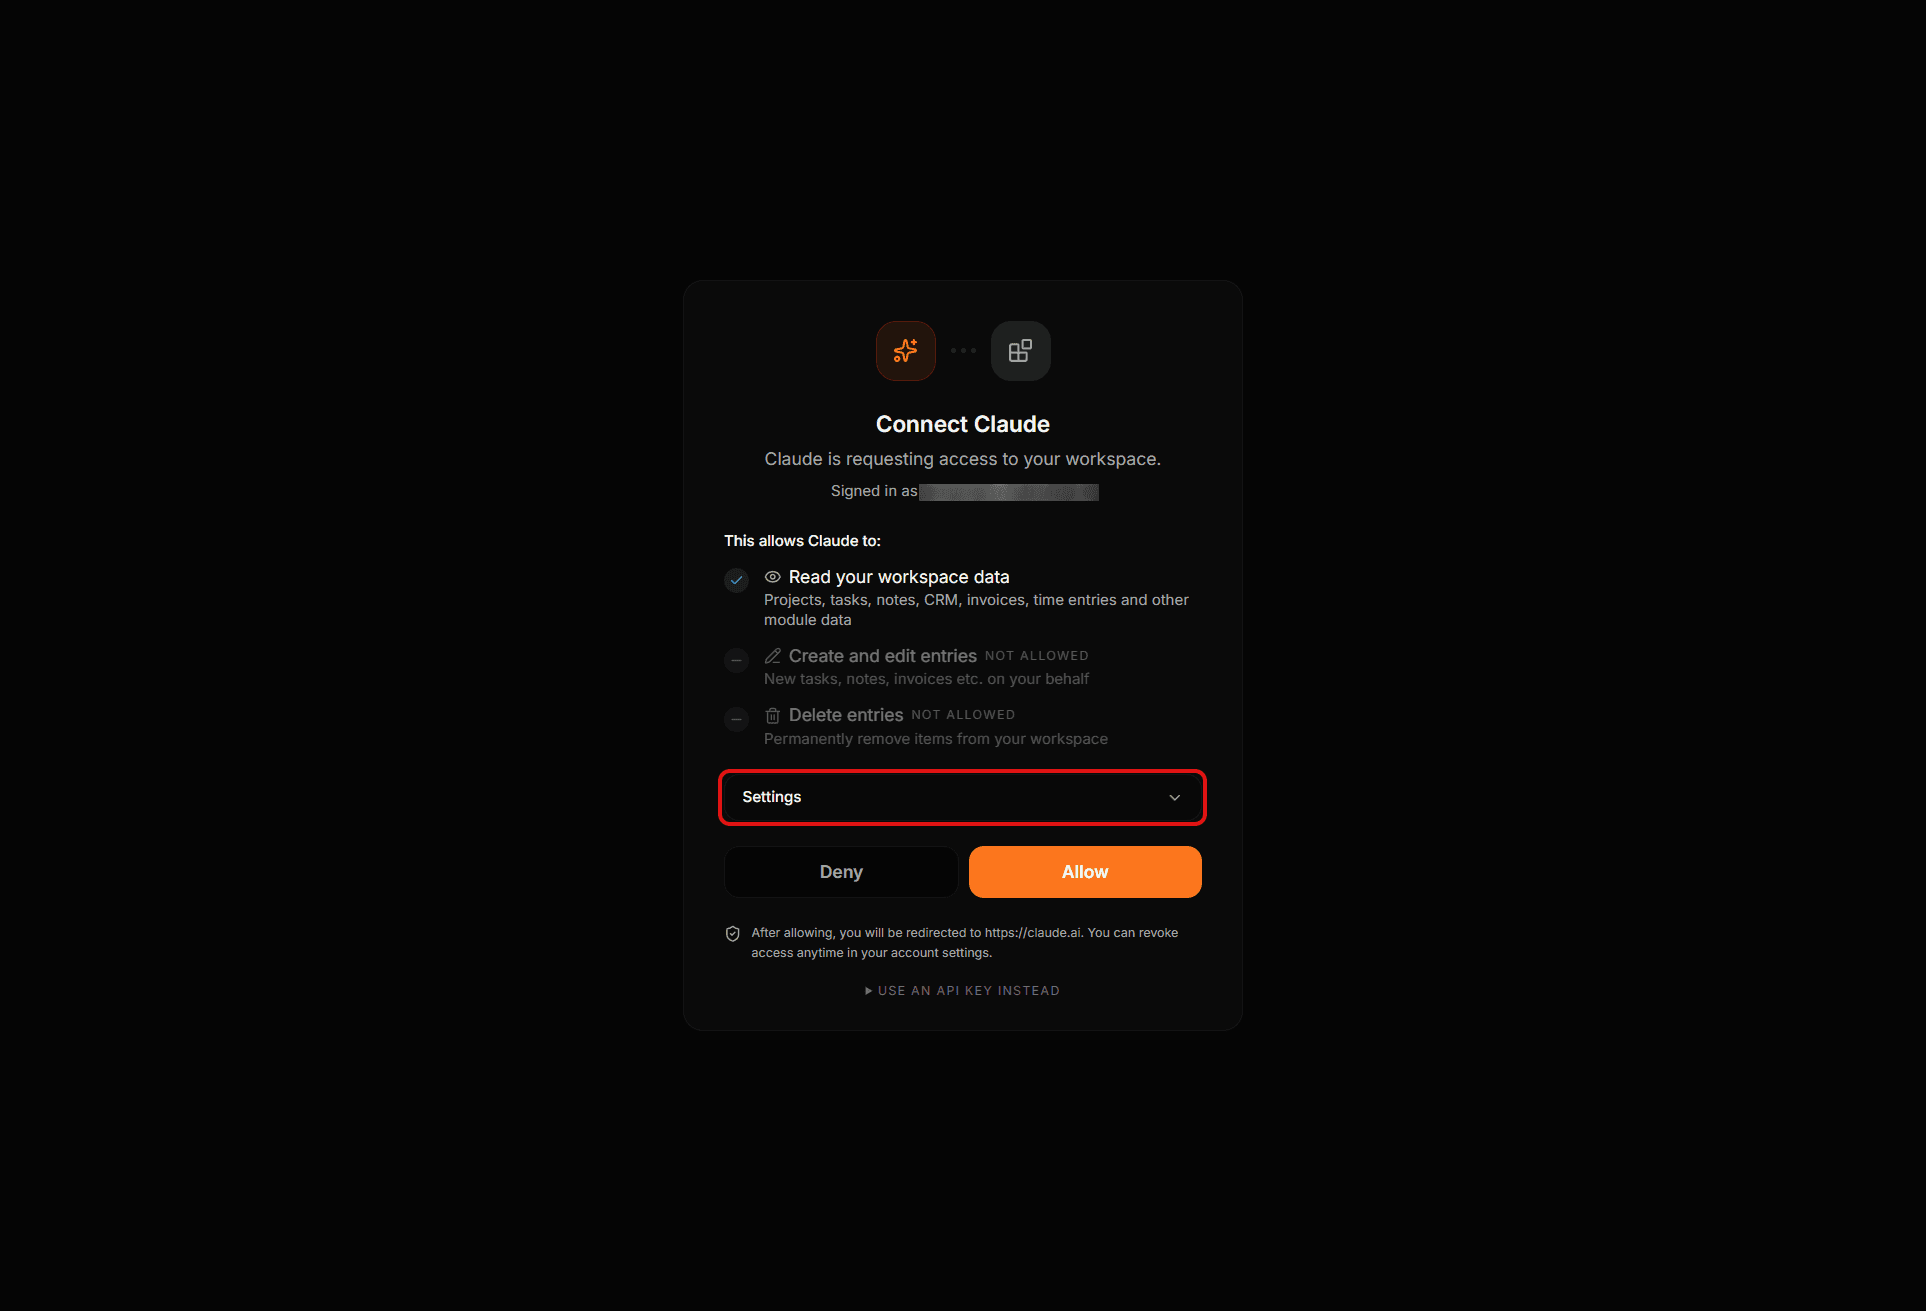
7. Sign in and open settings
Sign in to Takodo if asked. On the consent screen, open Settings to choose which organizations Claude may access.
8. Set the organization
In Settings choose the organization(s) Claude may access.
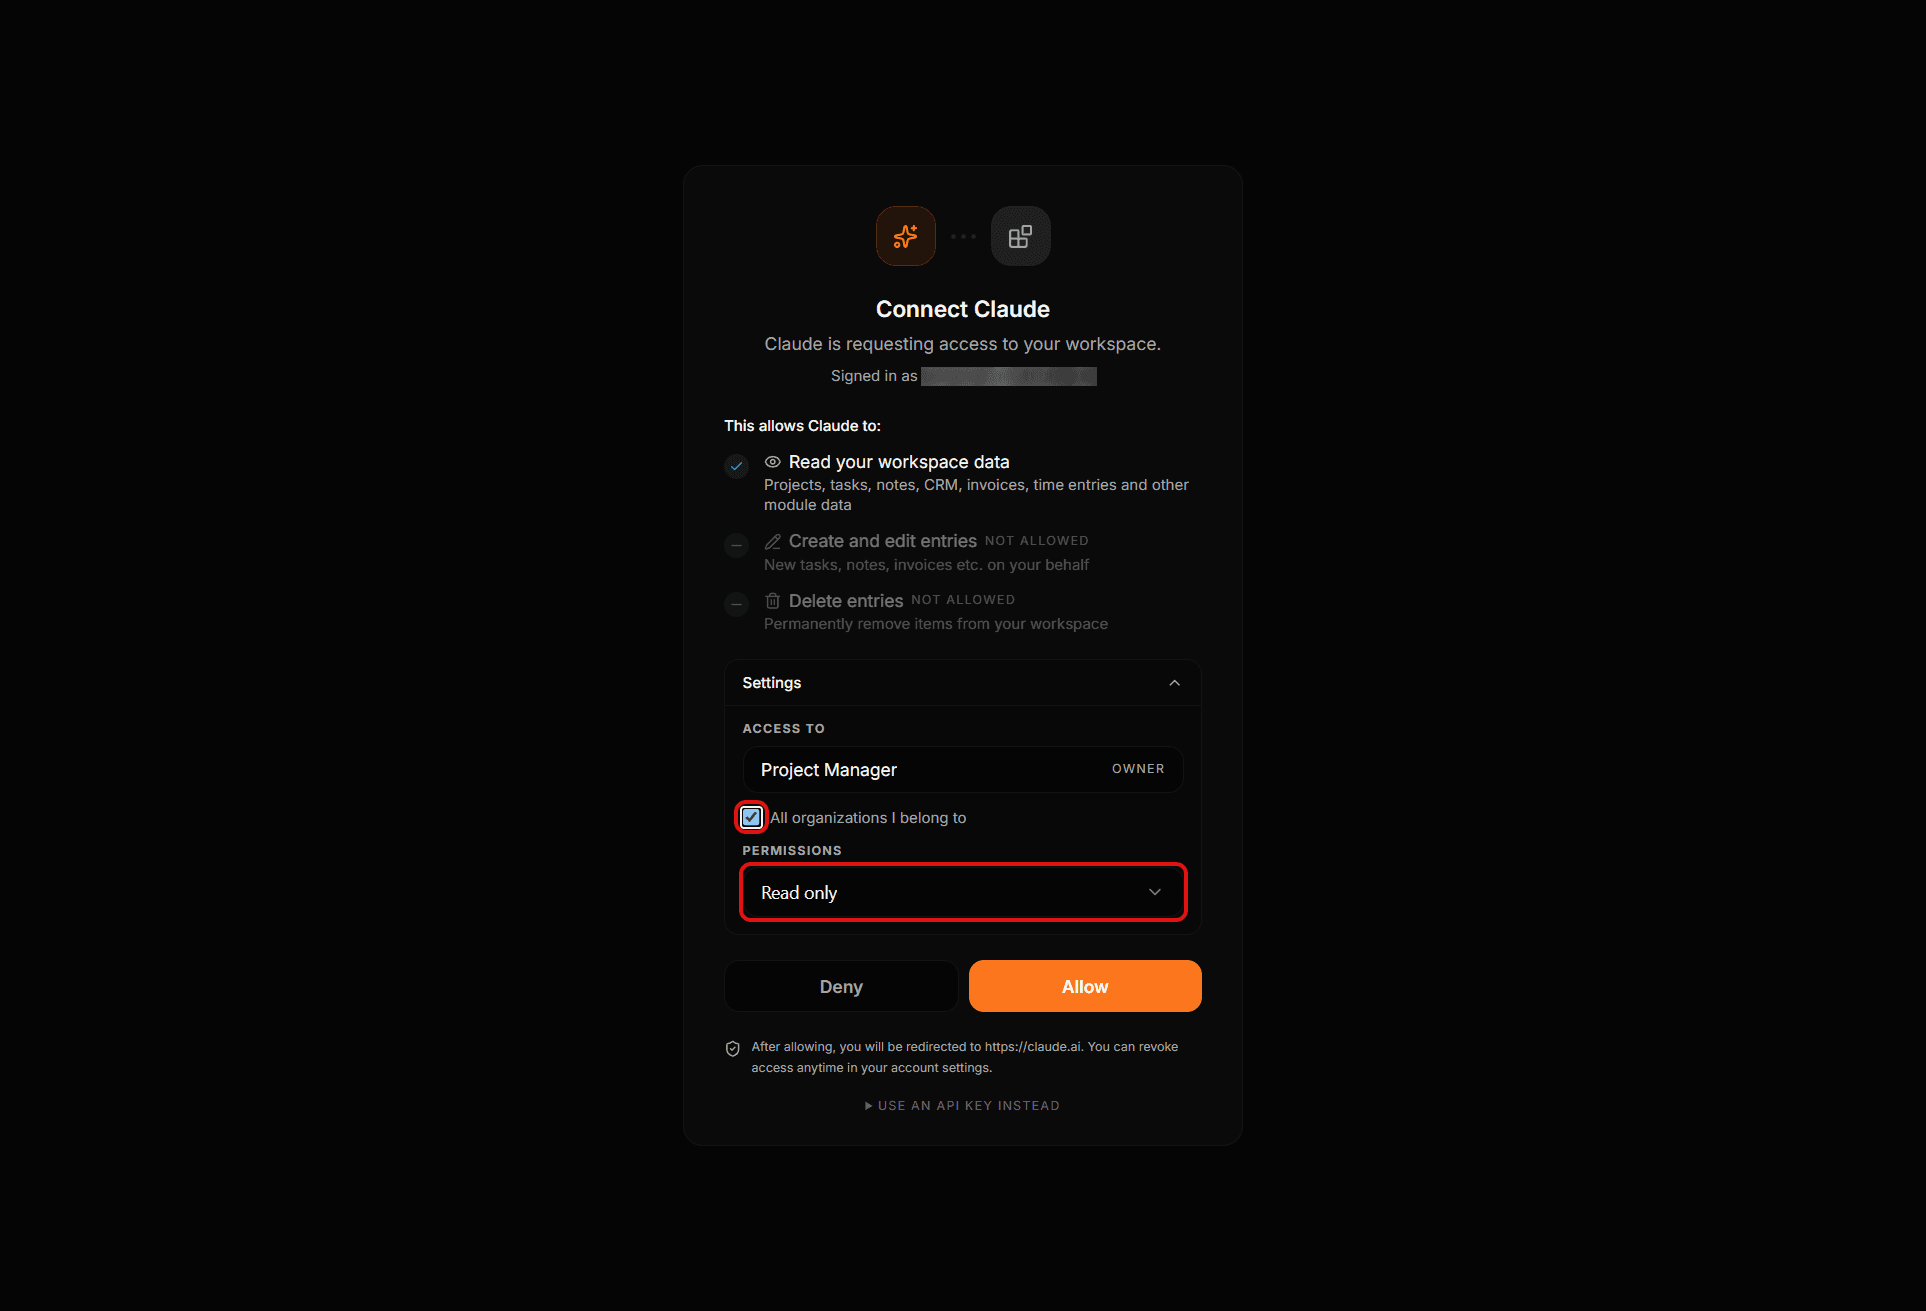
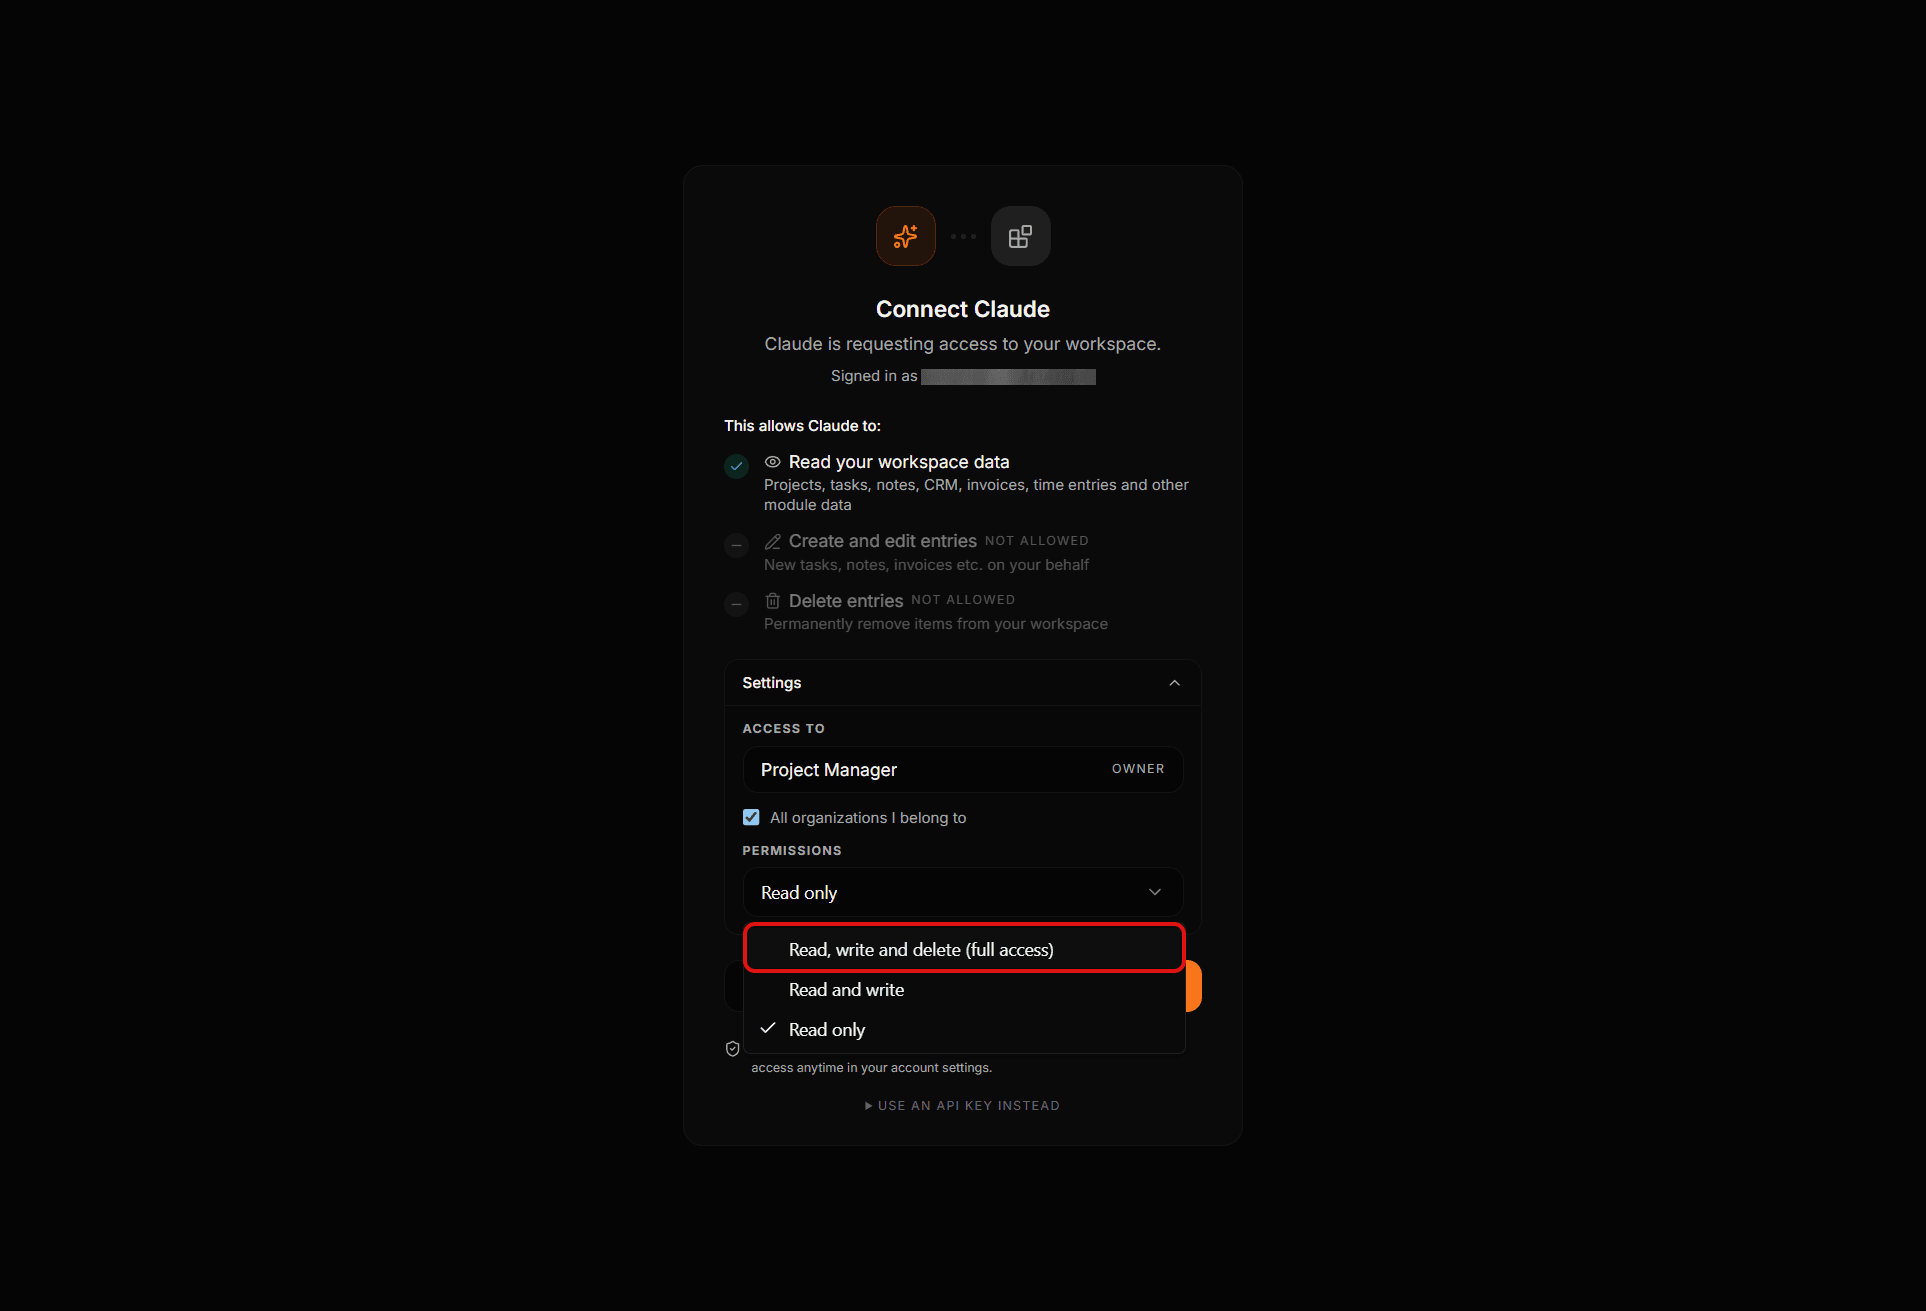
9. Choose the permission level and allow
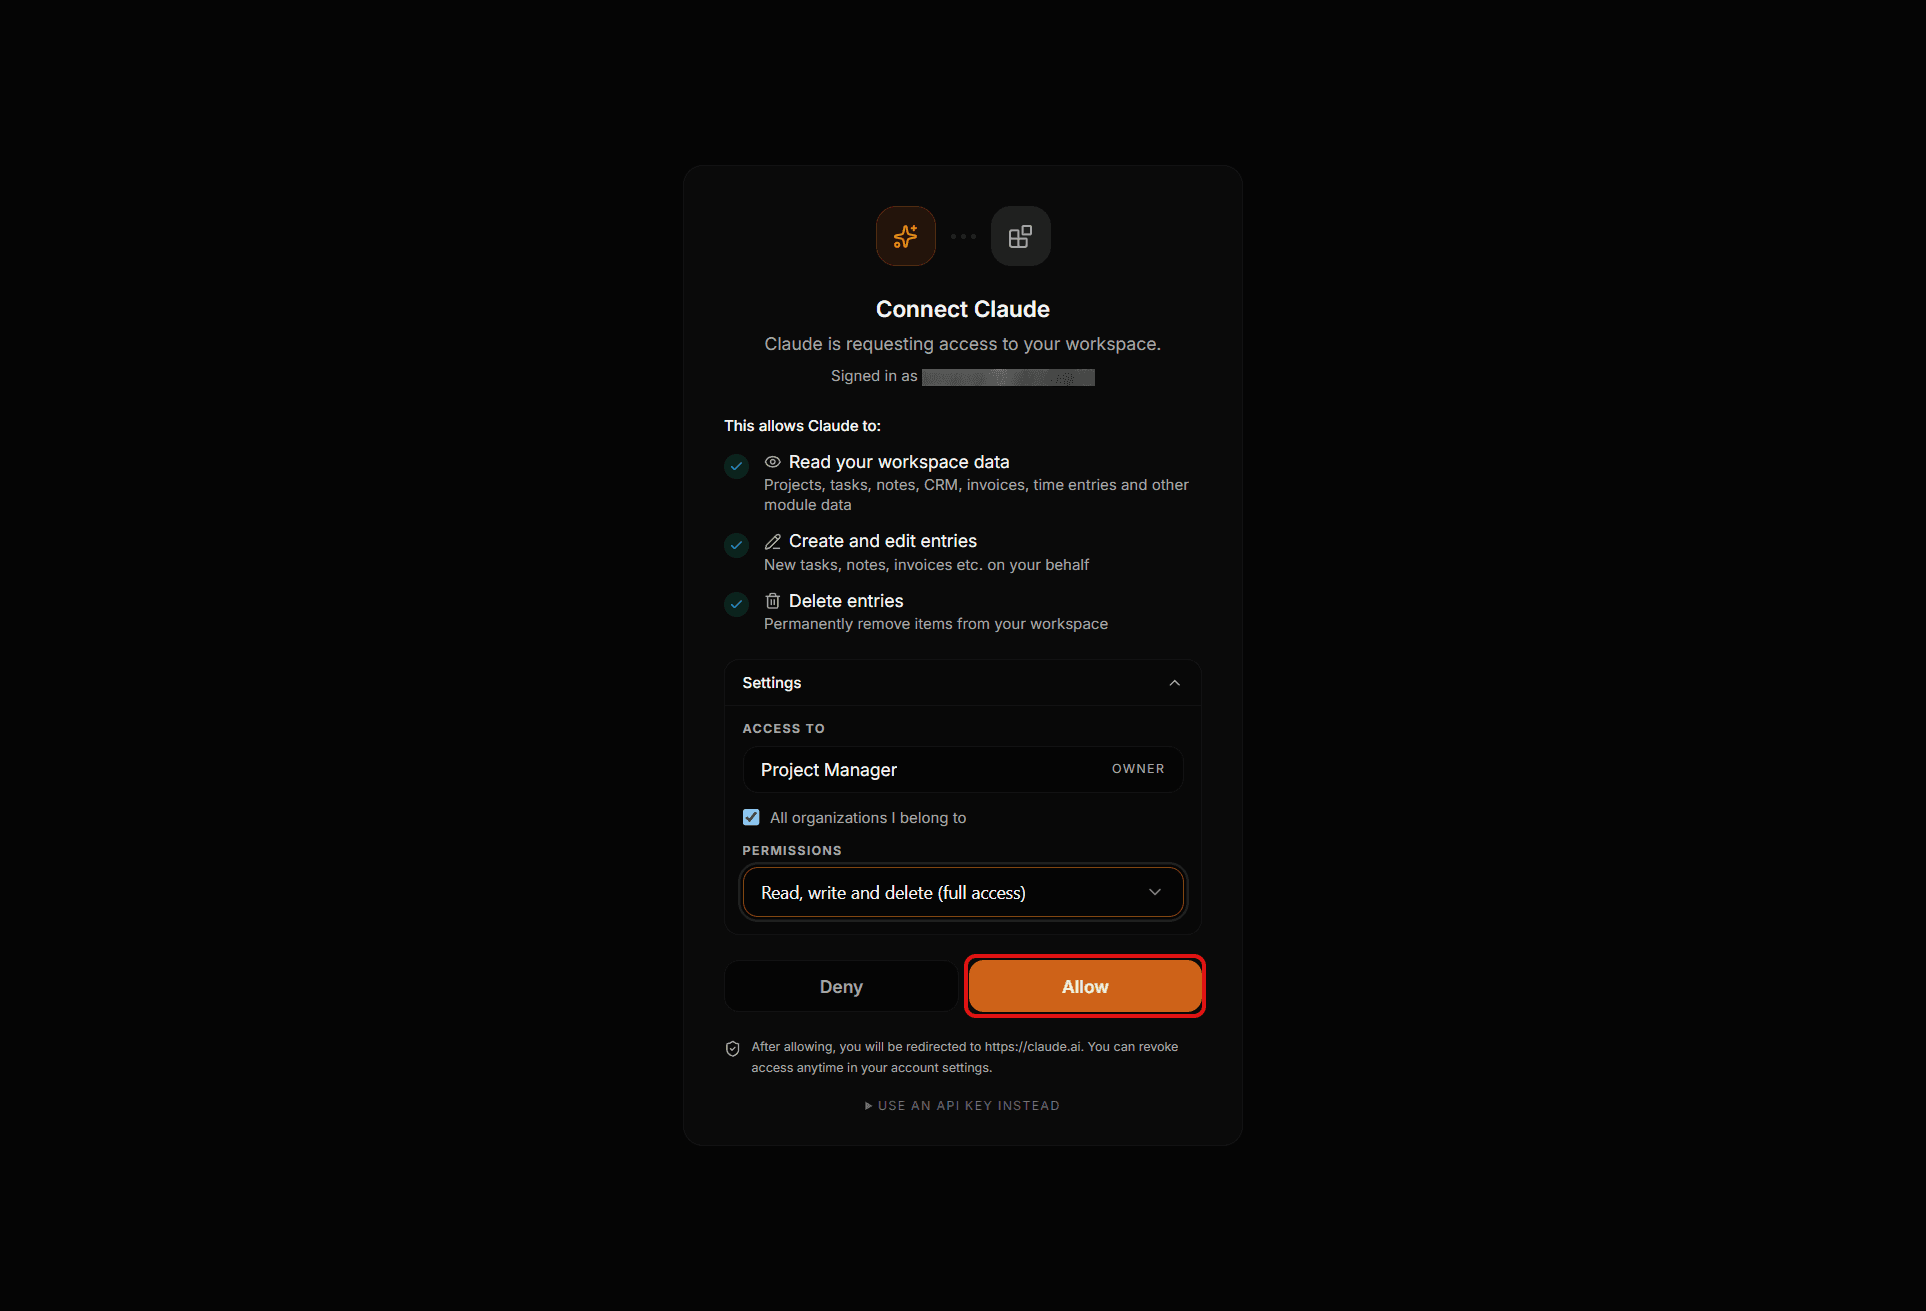
Choose the permission level: Read only (default), Read and write, or full access including delete. Then click Allow – you are sent back to Claude.
10. Done
Under the connector you can set per tool when Claude may use it (always allow, ask first, blocked). You can revoke access at any time in your account settings.
Way 1b: ChatGPT
ChatGPT connects to custom MCP servers via Developer mode. Availability depends on your plan; menu names can change.
- Open ChatGPT, then Settings → Apps & Connectors → Advanced settings and enable Developer mode.
- Go back to Apps & Connectors and click Create.
- Enter the name "Takodo", paste the MCP server URL (
https://app.takodo.at/api/mcp) and choose OAuth as authentication. - Confirm and sign in to Takodo. On the consent screen choose organizations and permissions, then click Allow.
- In a new chat, click + → Developer mode (or More) and select the Takodo connector.
The consent page: choose organization and permissions
The consent page shows what the client may do and lets you narrow access under Settings. Behind the scenes it creates a revocable access key; the token itself is never shown to you.
- Access to
- By default the currently active organization with your role. The connection is then bound to that organization.
- All organizations I belong to
- Makes the connection account-wide. The organization is then given per request (header or organization argument). Without an active organization this option is fixed on.
- Permissions: Read only
- Allows tools with scope read (read and list data).
- Permissions: Read and write
- Additionally tools with scope write (create and edit entries).
- Permissions: Read, write and delete
- Full access, additionally tools with scope delete. Preselected when the client does not request a narrower scope.
- Use an API key instead
- Alternative for clients without a browser session: enter an existing access key (mk_…) and authorize with it.
Way 2: Claude Code, Cursor and other clients with an access key
These clients read a bearer token from a configuration file. Create an MCP access key in your account under Integrations (the full key is shown only once) and add it to the MCP configuration.
- type
- http
- url
https://app.takodo.at/api/mcp- headers → Authorization
- Bearer <YOUR_KEY> – the key starts with mk_.
- headers → X-Organization-Slug (account-wide only)
- Slug of the organization the key should address.
- Open Account → Integrations and create a key for MCP/AI tools; set a name, the access level and the account-wide choice.
- Copy the key immediately – it cannot be shown again.
- Add server address and headers to your client's MCP configuration (entry mcpServers → project-manager).
- Restart the client and test with a read request.
Choose the organization: bound and account-wide keys
A connection is either bound to one organization or account-wide. For account-wide connections you choose the organization in one of these ways.
- Organization-bound
- The connection applies only to the organization that was active when it was created. It works only while that organization is your active organization in the web app.
- Account-wide + header
- X-Organization-Id, X-Organization-Slug or X-Organization-Name set the organization (evaluated in this order). Role and modules are derived from your membership in that organization.
- Account-wide without header
- All tools are listed and gain an additional organization parameter (name, slug or ID). Without it an error is returned; list_organizations works without an organization.
- Not a member
- If you name an organization you are not a member of, the server rejects the request.
Manage and revoke access
All connections – including those created via the consent page (named "Claude — connected <date>") – appear in your account under Integrations with name, prefix, permissions and last use. MCP keys and WebDAV keys are separate kinds and not interchangeable.
- Open Account → Integrations and select the key section for MCP/AI tools.
- Identify the connection by name and last use.
- Revoke it. From then on requests with that key and all OAuth tokens issued through it are rejected.
- Create a new connection with narrower permissions if needed.
Technical details for developers: OAuth endpoints and tokens
If you build your own client, the metadata is available at the standard paths. The flow is OAuth 2.0 authorization code with PKCE (S256 only); clients register dynamically (RFC 7591).
- /.well-known/oauth-authorization-server
- Authorization server metadata: authorization, token and registration endpoints; supports response_type code, grants authorization_code and refresh_token, PKCE S256 and token endpoint authentication none.
- /.well-known/oauth-protected-resource
- Metadata of the protected resource (
https://app.takodo.at/api/mcp) and a pointer to the authorization server. A 401 from the MCP endpoint points to it via WWW-Authenticate. - /api/mcp/oauth/register
- Dynamic client registration; issues a client_id (dyn_…). At least one redirect_uri must be allowed.
- /api/mcp/oauth/authorize and /token
- Authorization and token issuance. The authorization code is valid for 5 minutes, the access token for 1 hour, the refresh token for 365 days and is reissued on every refresh.
- Allowed redirect URIs
- Loopback addresses (localhost, 127.0.0.1, ::1) on any port and addresses the operator of the instance explicitly allowed. Other addresses are rejected.
- Direct keys
- Alternatively /api/mcp accepts any MCP key with prefix mk_ as bearer token.
Common pitfalls
Bound key and switching organizations
An organization-bound connection works only while its organization is your active organization in the web app. After switching, the server answers "Unauthorized" until you switch back or use an account-wide connection.
Keys are shown only once
A lost key cannot be recovered. Create a new one and revoke the old one.
Permissions too broad
Full access is preselected on the consent page. Choose "Read only" if the AI should only analyze.
Redirect is rejected
A client with a redirect address that is not allowed cannot sign in. The instance operator must allow the address.